Having gone through the experience of adding a custom alerts template to SharePoint 2010, I thought I’d share my learning during this process. This is the first part of two posts regarding custom alert templates. Updating existing alert subscriptions in SharePoint 2010 describes the challenges around updating existing alert subscriptions. In this post, I hope to cover what you need to know to create a custom alert template.
The out of the box SharePoint email alerts are defined in a file called alerttemplates.xml which lives in: C:\Program Files\Common Files\Microsoft Shared\Web Server Extensions\14\TEMPLATE\XML\
However, you should not edit this file, as this is not supported by Microsoft. If you change this file, there is a danger that your changes may be overwritten by a future SharePoint update.
You should also note that to effectively play with SharePoint alert templates, you will need to have a working alerts email mechanism i.e. Having defined a mail server for your web application in Central Admin.
Creating and packaging a custom alerts template file
Most sane SharePoint developers would want to deploy this file through a WSP file. There are numerous benefits to deploying solutions through WSP files especially in multi-server farms (which is not what this post is about). At this stage you can create a new blank SharePoint 2010 solution using Visual Studio 2010 or use an existing solution (most likely case if want this task to be a part of a larger project).
Note: If you are creating a devoted solution for deploying your custom template file, make sure that the ‘Include Assembly In Package’ property of your Visual Studio solution is set to false, otherwise the WSP generated will contain a needless assembly.
Lets begin…
Add a mapped folder to /layouts/template/xml/
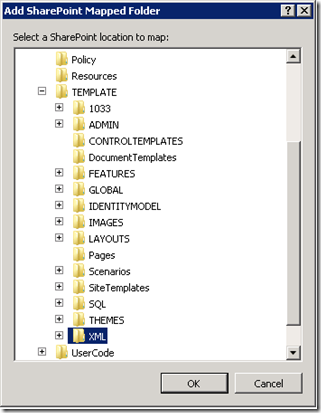
Right click your solution in Visual Studio > Add > SharePoint Mapped Folder… 
Choose {SharePointRoot} > TEMPLATE > XML , click ‘OK’

You will now see an XML folder appear in your Visual Studio solution.
Add a new xml file to this folder called ‘custom_alerttemplates.xml’. Open the alerttemplates.xml file from C:\Program Files\Common Files\Microsoft Shared\Web Server Extensions\14\TEMPLATE\XML\ , copy all of its contents into your newly created custom_alertstemplates.xml file.
Modifying the custom_alertstemplates.xml
Things you must understand before continuing:
- You should never remove any existing AlertTemplates items from the AlertTemplates definition. Each type of template is required by different types of lists inside your SharePoint site.
- Each AlertTemplate definition is differentiated by its ‘Name’ attribute e.g. ‘SPAlertTemplateType.GenericList’.
- ‘SPAlertTemplateType.GenericList’ seems to be the default alert type unless the list defines otherwise by default or the AlertTemplate attribute of a list instance is set explicitly to use a particular template. I will should you how to do this later.
- Any existing subscriptions on a list do not get updated when you update the AlertTemplate property for a SPList. (How to tackle this coming soon…)
- Each AlertTemplate contains multiple templates inside it, here is a description of what these do:
- <digest> – This would be the template for a periodic alert such as a weekly alert.
- <immediate> – This will be triggered upon certain events such if an item is added or modified.
Depending on your requirements, you may wish to modify an existing alert template or create a new alert template style and apply that to a particular list. There are some considerations to be made with either choice. If you are changing an out of the box template, you will have to consider the impact on all current and future lists that are going to be using the email template. e.g If you modfify SPAlertTemplateType.GenericList, all custom lists will be impacted. Does this mean you’ll need more time for testing? Instead, if you want to add your own alert template, how will you associate all appropriate list instances to your alert template?
The best way to create your own alerts template is copy/paste an existing AlertTemplate definition to the bottom of the AlertTemplates object. You can then look at the way existing templates are coded and get a good idea about what you need to do to get the desired effect. As part of creating a new AlertTemplate section, you will need to assign the section with a unique Name attribute value.
Deploying your custom alert template file
You need to pay attention to this section as you will this need to do this a lot during your development lifecycle. Simply copying your file to the 14 hive won’t update the template. You will need to run the following stsadm command to load your changes into SharePoint, after you have deployed your wsp file:
stsadm -o updatealerttemplates -filename 'C:\Program Files\Common Files\Microsoft Shared\Web Server Extensions\14\TEMPLATE\XML\custom_alerttemplates.xml' -url http://yoursitecollectionroot/
Then you will need to restart the ‘SharePoint 2010 Timer Service’ from Windows Services. This forces SharePoint to load the latest version of your xml file changes.
If you decided to create your own AlertTemplate in the custom_alerttemplates.xml, you will need to set the set the SPList.AlertTemplate property of each list for which you need set the custom alerts template. This property will need to be set to the unique Name attribute that you assigned to your new AlertTemplate section. You have to do this using the SharePoint object model, which only leaves you with two choices. Either write some compiled code which is triggered by an event, such as a feature activation or list creation, or write a PowerShell script which calls the object model. Bellow is some code I’ve written to do this using PowerShell. After running this script, you will need to delete and re-subscribe to the alerts for the target list.
add-pssnapin Microsoft.SharePoint.PowerShell -erroraction silentlycontinue
$contentService = [Microsoft.SharePoint.Administration.SPWebService]::ContentService

$AlertsTemplateCollection =  new-object Microsoft.SharePoint.SPAlertTemplateCollection($contentService)

$spWeb = Get-SPWeb -Identity http://yoursitecollectionroot/
$splists = $spWeb.lists

$alertslist = $splists["YourTargetListName"]

$alertslist.AlertTemplate = $AlertsTemplateCollection["YOUR_UNIQUE_TEMPLATE_NAME_VALUE"]

$alertslist.Update()
$spWeb.Dispose()
You will also need to perform this procedure when deploying the changes to other environments.
Tips for development
If you want to re-deploy alert template changes through Visual Studio, you’ll find that the changes won’t be recognised just by redeploying your xml file to the 14 hive. You will need to run the stsadm -o updatealerttemplates command again followed by resetting the ‘SharePoint 2010 Timer Service’. You will not need to run the PowerShell script again to set the AlertTemplate property for each list associated with your alert template. You should also read and understand my second post on this subject: Updating existing alert subscriptions in SharePoint 2010 as it make your development experience easier.
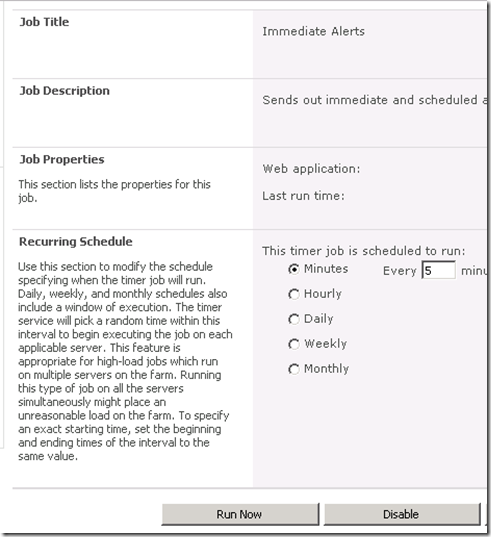
Every time you make a modification to the template and deploy it, you will have to wait until the ‘Immediate Alerts’ timer job runs for your web application. If you have access to the Central Admin site, you can trigger this timer job manually.
- Browse to the Central Administration site.
- Monitoring > Review job definitions

- Find the ‘Immediate Alerts’ time job for your web application and click on the link. (There will be one for each web application so make sure you click the correct one).
- Once you are on the Edit Time Job page, I would suggest that you add a favourites link to this page in your browser as you will be need get here quite often during development and testing.

- Click on the ‘Run Now’ button on this page which will trigger the alert emails saving you a bit of time. (You can also configure the timer job to run more often if that suits you better)
You should now receive your custom template alert email.